: Passing null to parameter #1 ($string) of type string is deprecated in <b>/home2/makemyes/public_html/wp-content/themes/Newspaper/loop-single.php</b> on line <b>60</b><br />")
Writing your first WordPress submit can really feel like a problem particularly once you’re not acquainted with the WordPress editor and Gutenberg blocks.
On this submit we are going to undergo methods to add WordPress posts in your website, together with methods to edit, schedule and publish.
In no time you’ll be publishing your first submit in your WordPress website.
Let’s get began…
What’s the distinction between WordPress posts and WordPress pages?
While you log into your WordPress website you’ll discover two choices so as to add content material – posts and pages:
So, what precisely is the distinction between them, and the way do I do know which so as to add my content material as?
A WordPress web page is a static and infrequently up to date piece of content material, often timeless in its function. Examples of WordPress pages are: about, contact, disclosure, phrases & situations.
A WordPress submit is often a part of a weblog like we’ve got right here on Blogging Wizard. It’s the place we ceaselessly publish and replace content material on an ongoing and steady foundation.
Understanding the WordPress block editor
Log into your WordPress website and also you’ll see your WordPress dashboard. Then go to Posts → Add New on the admin panel to the left.

A brand new submit will seem, this can be the place you enter all of your content material to your submit utilizing the Gutenberg visible editor.
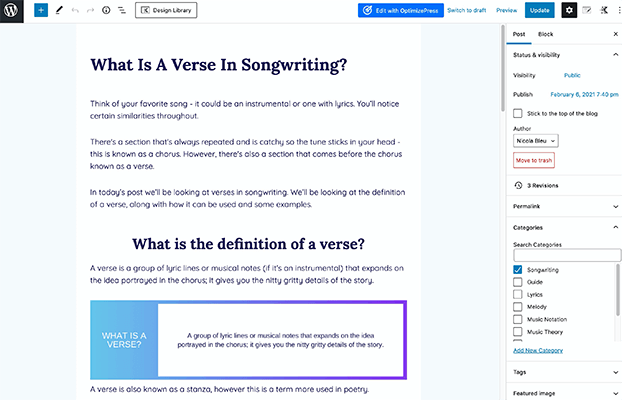
Let’s have a fast overview of the WordPress editor and submit settings. For the submit setting to seem you’ll must click on the gear icon high proper:
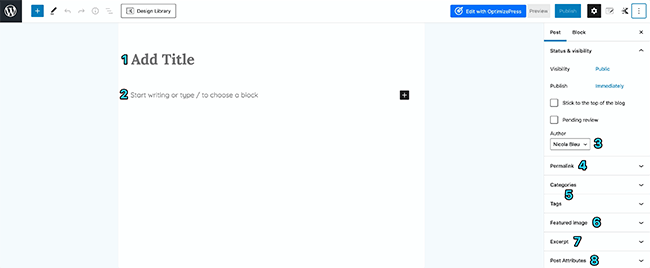
- Publish title
- Publish content material
- Publish writer
- Permalink
- Classes and tags
- Featured picture
- Excerpt
- Publish attributes
The stack of three dots – high proper nook exhibits you the Choices mode. The primary options right here is the View mode of the submit corresponding to fullscreen to take away distractions, and Editor mode which converts to the submit to both Visible or code editor (view in html code).
Let’s undergo the submit settings and what it’s best to do.
1. Publish title
Your title is your headline. It’s a assertion displaying the reader what you’re going to ship within the written content material under.
Headlines can are available in many kinds corresponding to questions, statements, and numbered lists. Nonetheless, keep in mind your headline is basically a promise to the reader. You’re promising one thing of value and related to the reader.
For those who need assistance writing charming headlines, take a look at our information to writing higher headlines.
2. Publish content material
Earlier than you even start to put in writing out your submit content material you’ll have finished your analysis into your viewers, their ache factors and what they wish to study. The subsequent step is to put in writing a compelling weblog submit that your viewers will love and share.
On this part, the sky’s the restrict. You possibly can add in textual content, photos, embed audio and movies, add quotes and a lot extra utilizing Gutenberg blocks.
The wonderful thing about Gutenberg is the variety of third-party plugins obtainable to increase the usual record of blocks Gutenberg affords with extra customizable choices, most of that are free.
Take a look at our submit on WordPress Gutenberg Blocks Plugins to study extra.
3. Publish writer
That is the place you choose the writer of the submit you’re publishing.
By default, your writer account can be chosen. However, you probably have different writers, you may change the writer to their account by deciding on it from the record.
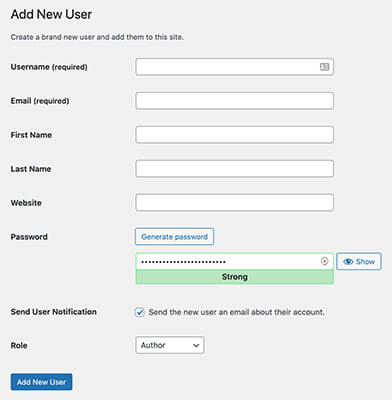
Observe: You possibly can add a brand new writer in your WordPress dashboard. Simply head to Customers → Add New and add their particulars. You possibly can choose a task that can change the permissions they may have. Generally, Contributor or Creator permissions are greatest. As soon as the account is created, you may edit it and add their writer bio which can seem under their weblog posts. Nonetheless, the show of writer bios is managed by your theme.
4. Permalink
The vacation spot or house of your WordPress submit is set by the permalink (also referred to as the submit URL) you select. That is seen within the handle bar of your browser:
![]()
The phrases in your URL will often comprise your key phrase out of your submit. For instance, your title could possibly be “The Beginner’s Information To Cleansing Your Residence,” due to this fact, the key phrase to your submit URL can be “cleaning-your-home.”
5. Classes and tags
Classes and tags are a part of WordPress’s taxonomy system.
Classes are used to prepare your posts and are extremely helpful to your readers who wish to study extra on a selected subject moderately than browse aimlessly via every web page of your weblog.
Classes come within the type of mother or father and little one classes. Mother or father classes are your high tier classes, they’re broader.
The instance under is from Tone Island’s submit editor in WordPress:
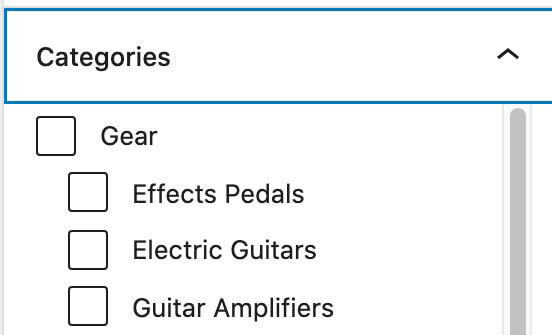
The mother or father class is the time period ‘Gear,’ the kid classes are then listed under: pedals, guitars and amps.
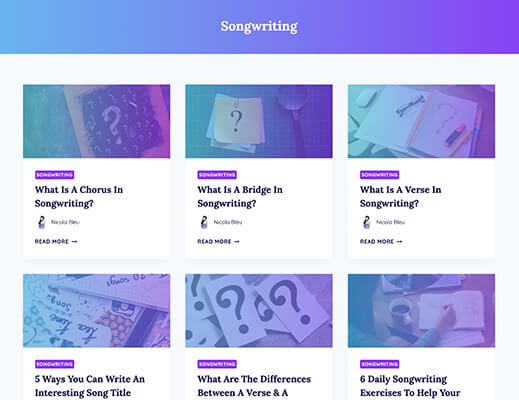
On the frontend of your website, in case you click on on the class, it’ll redirect you to the archive web page of the class. Right here’s an instance from Your Artistic Aura in case you click on on the subject ‘songwriting’:
For those who don’t assign a class to your submit, it mechanically goes to the ‘Uncategorized’ class.
Tags alternatively are elective to make use of, and never all web sites use them. We don’t use them right here on Blogging Wizard.
Tags are a option to be extremely particular in regards to the points you’re masking in your weblog submit. Classes, each mother or father and little one are comparatively broad. Nonetheless, tags can cowl a number of key phrases, singular phrases and phrases related to the subject.
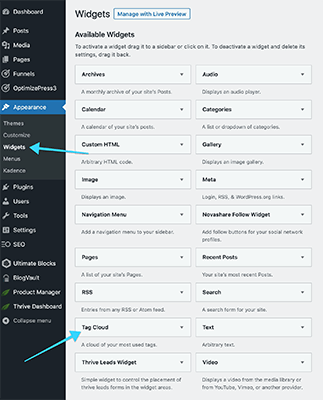
You possibly can show a tag cloud by going to your WordPress admin dashboard, going to Look → Widgets and deciding on the Tag Cloud.
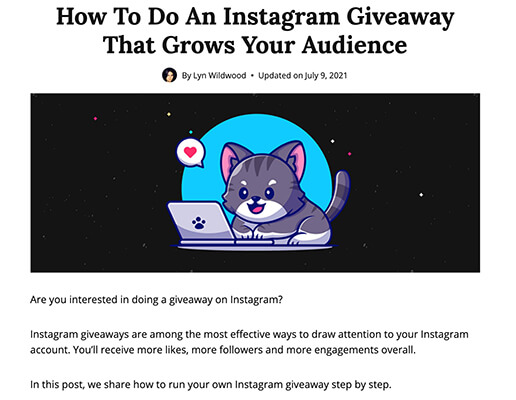
6. Featured picture
Nearly all of blogs use featured photos as a visible commercial of their submit. This can be displayed on their weblog homepage in addition to the submit itself, but additionally can be utilized to share on social media and by way of different networks.
You don’t need to be a graphic designer to create photos to your posts. Instruments like Visme and Placeit make this particularly straightforward.
Take a look at our record of on-line graphic design software program instruments.
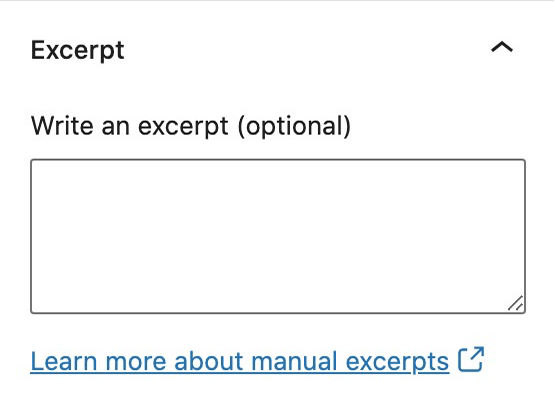
7. Excerpt (elective)
An excerpt is a brief extract from the submit which is used as a abstract to your weblog posts.
WordPress will mechanically generate an excerpt for you in case you depart this clean. And that’s utterly effective. That’s precisely what we do:
Nonetheless, you may manually set the excerpt inside the submit editor. Additionally it is price noting that some themes (e.g. Kadence) will provide you with the choice to manage the size of mechanically generated excerpts. By default, they’re often 55 characters.
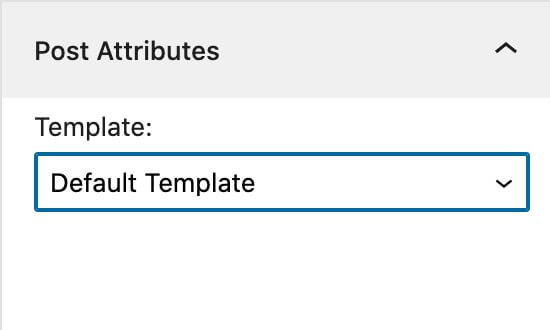
8. Publish attributes
Publish attributes provide the possibility to pick out completely different submit templates.
Chances are you’ll not see this selection in any respect and that’s okay in case you don’t. You’ll doubtless solely see this selection you probably have created a unique submit template with a web page builder plugin or your WordPress theme affords further attributes.
For now, both depart it because the default possibility or skip it fully.
Now we’ve been via the primary components concerned when including a submit to WordPress, let’s undergo the bodily half and add a submit to WordPress.
Find out how to add a submit in WordPress
You possibly can add a submit to WordPress in two methods, by scratch or by pasting the content material from a phrase processor. We’ll undergo each.
Writing a submit in WordPress from scratch
Log into your WordPress website, head over to Posts → Add New, and also you’ll be confronted with a clean draft WordPress submit.
Relating to writing a brand new submit from scratch it’s best to have a course of or guidelines to comply with to be sure to full every activity required to publish a profitable weblog submit. The order I present right here doesn’t need to be the order you select for your self.
Observe: Previous to writing your submit in WordPress do your analysis and preparation. Additionally it is greatest to put out a draft construction of your submit together with headings and an summary for every part.
1. Add a submit title
Step one is so as to add in a title to your new submit. For those who don’t have the very best optimized headline but, simply kind in a draft one as a result of you may edit this additional down the road.
2. Begin including your content material
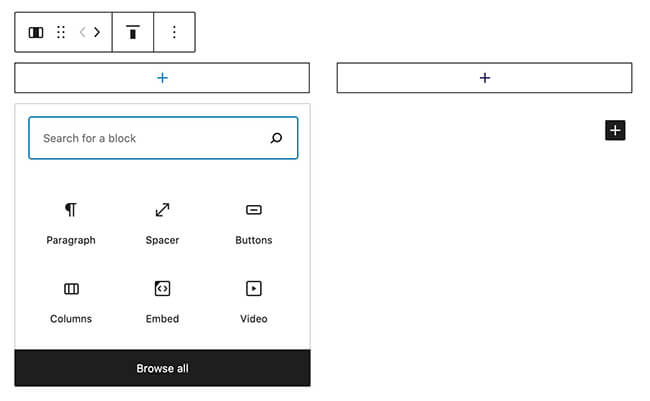
Utilizing the Gutenberg visible editor is completely different out of your typical phrase processor; nonetheless, it’s comparatively easy to make use of. Content material is added by way of blocks which you add by clicking on the plus button:
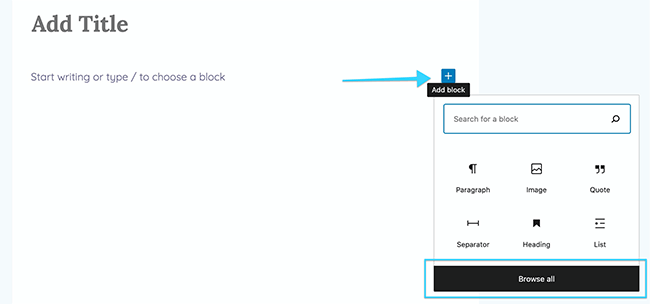
A popover seems supplying you with the most well-liked blocks used corresponding to paragraph, picture and headings. For those who want a selected block not proven, click on Browse all for a wider choice:
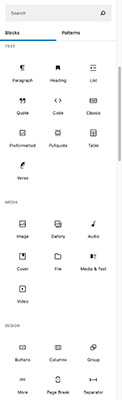
Blocks are damaged down into classes: textual content, media, design, widgets, embeds and website positioning.
There are various third-party Gutenberg block plugins obtainable corresponding to Kadence Blocks, nonetheless, all through this tutorial I’ll be utilizing the default WordPress Gutenberg blocks.
We’ll now undergo the most typical blocks you’ll doubtless use to your posts.
Observe: While writing your new submit in WordPress don’t neglect to click on ‘Save draft’. WordPress does have an autosave function, nonetheless, it’s best to not depend on this incase you’ve browser or web connection points.
Textual content blocks – paragraphs, headings and lists
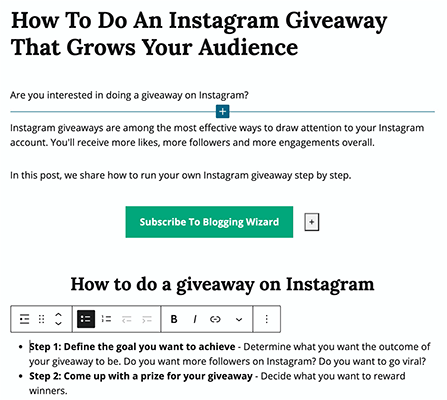
Right here we’ve got the introduction to a weblog submit, our title on the high adopted by a number of paragraphs, a button (we’ll get to buttons later within the submit), a heading and a bullet level record:
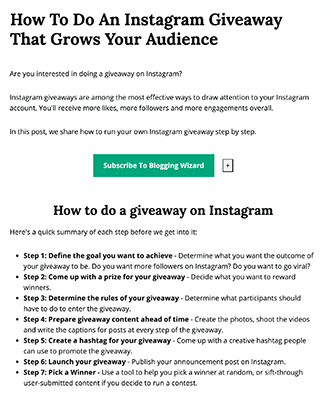
Let’s undergo how we add and edit them.
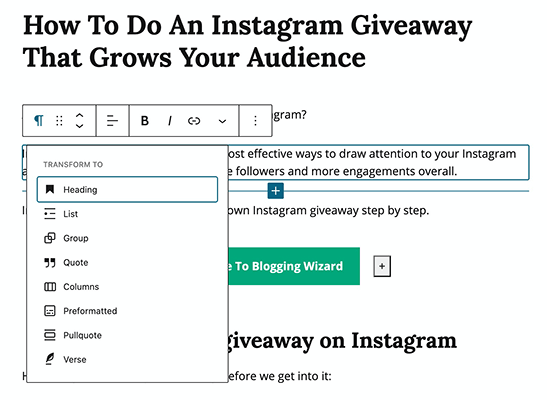
Beginning with the paragraph we add a paragraph block, or we are able to simply begin writing. If we click on on the paragraph a floating textual content editor will seem:

Right here we are able to edit how the paragraph block appears.
- Ranging from the left we are able to remodel the block:
- If we click on and maintain on the dotted grid, we are able to transfer the block up or down the web page to rearrange the order of the blocks.
- The up and down arrow means we are able to transfer the block up or down by one for each click on.
- Alignment – left, proper or middle
- Daring or italic model
- Add a hyperlink (by highlighting particular phrases within the block first)
- Drop down arrow – spotlight textual content, change textual content colour and extra options
![]()
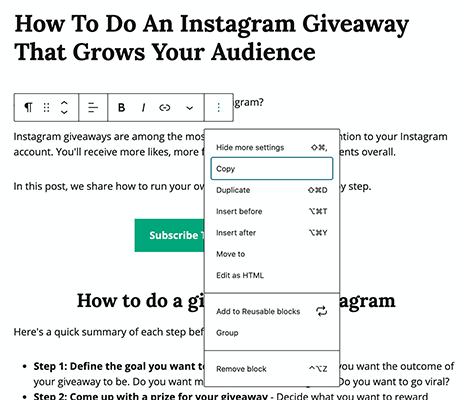
- Lastly, by clicking the three dotted button we’ve got additional settings corresponding to copy, duplicate and edit as html. The edit as html function is helpful if you’re acquainted with html code:
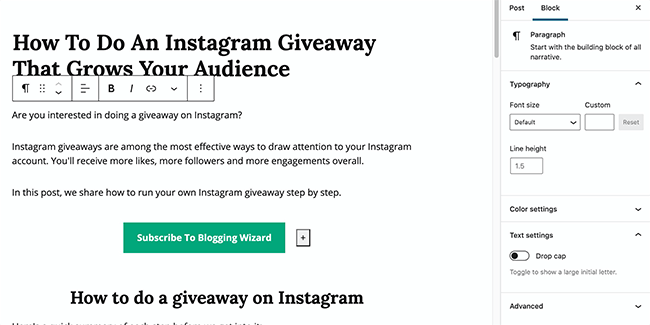
Additionally, you will see an possibility for extra settings. When clicked a tab will seem on the best aspect of the editor which will provide you with choices to alter your font dimension, line top and colour settings.
Let’s now have a look at headings. If we click on on our heading from our instance, we are able to see the floating textual content editor pops up once more, nonetheless this time with an additional function – an possibility to alter heading ranges.
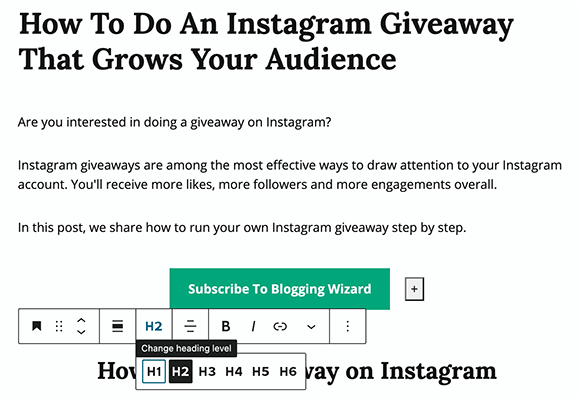
A heading is mechanically added as a H2 that are the primary headings in your content material, H1 being your title. The hierarchy of heading may be summarized as:
- H1 – title
- H2 – fundamental headings in a submit
- H3 – subheadings to your H2’s
- H4 – subheadings to your H3’s
- H5 – subheadings to your H4’s
Observe: While you construction your weblog submit it’s best to preserve the hierarchy of headings in thoughts.
Let’s now have a look at our bullet level record. If we click on on our record from our instance, the floating textual content editor will seem once more with a number of further options particularly for lists – bullet level and numbered.
Observe: At any level, in case you’ve made an error with a block or want to alter it you may click on on the furthest left button on the floating textual content editor to remodel it into a unique block, corresponding to a paragraph to a heading, or you may spotlight a bunch of paragraphs and remodel into a listing.
Media blocks – picture, video and audio
Pictures are a visible illustration of the content material of your submit, they could show some extent visually or present path and instruction within the context of a tutorial.
Let’s undergo methods to add a picture and its settings.
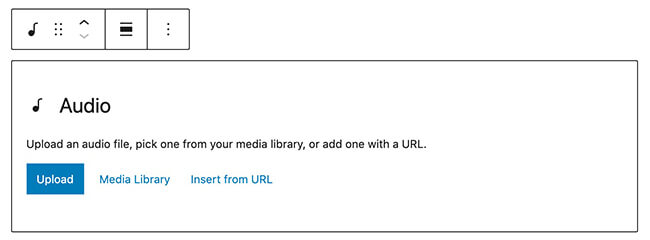
So as to add photos, choose the picture block and it will seem, a clean picture block:
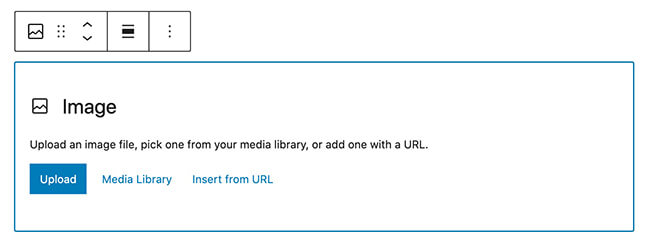
Similar to all different blocks we’ve proven thus far, a floating bar seems nonetheless with just a few settings. Within the picture block you’ve 3 choices so as to add your picture – Add, Media Library and Insert from URL.
The commonest choices are Add and Media Library.
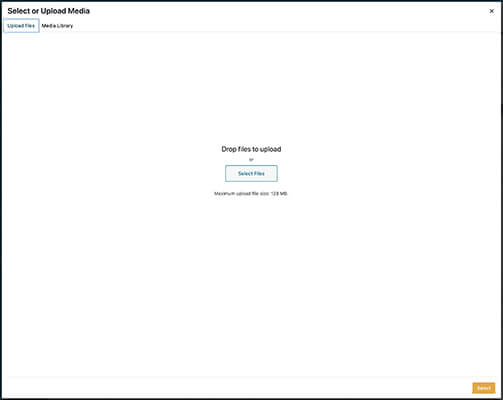
Choosing Add will provide you with the choice to pull and drop the picture/s out of your laptop that you just wish to place into your submit; the Media Library will allow you to pick out a picture out of your library:
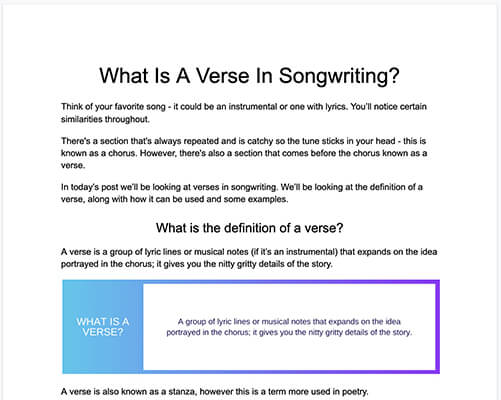
Utilizing the identical instance from Blogging Wizard, here’s a part displaying a picture we’ve positioned right into a submit:
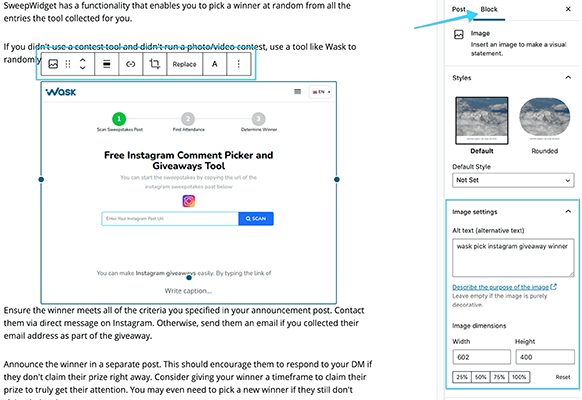
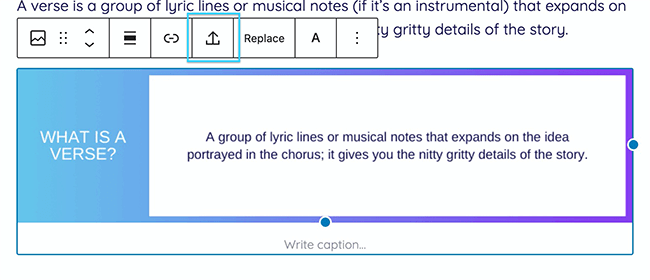
With a picture now in place the floating bar now provides us a number of extra choices: crop, substitute and add textual content, and the tab on the right-hand aspect of the editor exhibits extra picture settings: alt textual content and dimensions. Alt textual content is the written ingredient of your picture which can present when the picture can’t be rendered.
Though you may crop and resize photos in WordPress, additionally it is greatest to optimize your photos previous to importing to your Media Library, it will save on internet hosting sources and enhance web page load occasions.
Let’s now have a look at including audio and movies, each may be finished in 3 methods: including an audio/video block, embedding the audio/video relying on the platform it comes from or by including a shortcode.
Including the audio/video on to your Media Library means it makes use of your internet hosts sources, which for small companies, solopreneurs or hobbyists’ might not be appropriate in case you’re on a small or restricted plan. Movies in 4K can take up a number of GB of cupboard space if not correctly optimized.
Our second possibility is to make use of a particular platform block corresponding to YouTube, Spotify or SoundCloud (discovered within the Embeds part):
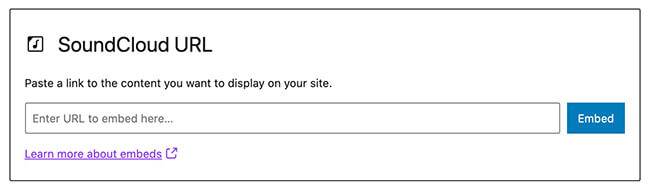
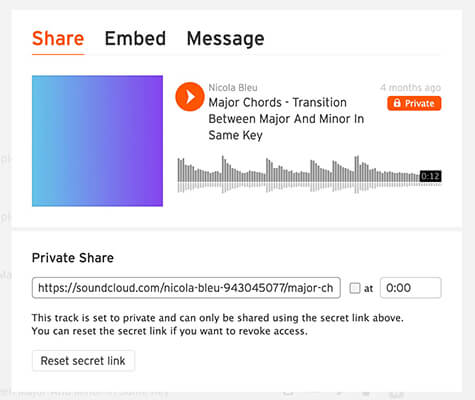
It’s so simple as discovering the URL of the audio and pasting it into the audio block:
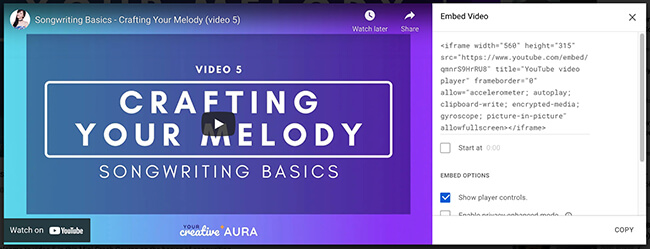
Lastly, we are able to embed our audio/video by discovering the shortcode and pasting it right into a shortcode block (discovered within the Widgets part):
As soon as your audio/video has been uploaded or embedded, further settings will seem once you click on on the block. For audio these further settings embody autoplay and loop, and for video these embody playback controls, autoplay and loop.
Design – buttons, columns, and spacers/separators
With Gutenberg blocks you’ve extra management than you assume over how every submit appears, particularly once you take a look at the design blocks.
Probably the most helpful blocks are buttons, columns and spacers/separators. Let’s look into how every of them works.
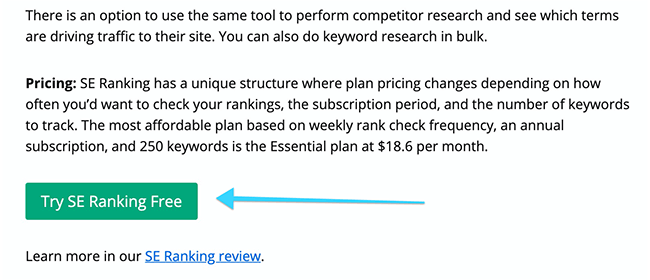
Buttons are useful for steering your readers consideration to one thing vital, moderately than inserting a hyperlink within the textual content, you’d create a button. Buttons are mostly used for name to actions, corresponding to subscribe or affiliate buttons.
Right here’s an instance of a button on Blogging Wizard utilizing the Gutenberg button block:
So as to add a button, click on the plus button within the WordPress visible editor and choose Buttons. A clean button will seem:
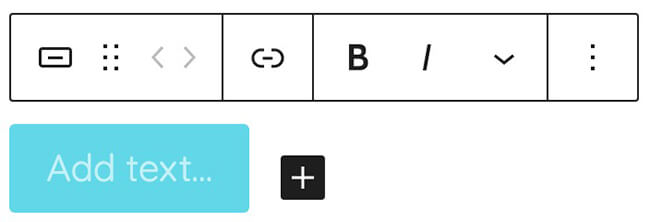
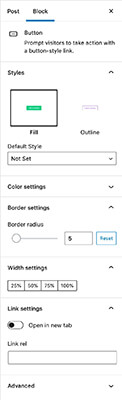
By clicking on the button, you may label it, for instance “Strive This Software”, “Subscribe” and so on. The floating bar provides you choices to customise your button corresponding to add a hyperlink, make it daring or italic. The primary customization comes from the tab on the best which lets you:
- Change the model of your button – fill or define
- Edit the colour of the button and textual content
- Edit the border radius and the width
- Hyperlink settings
- And customized css you may want to add
For those who want multiple button within the block, then merely click on the plus button so as to add extra. Additionally, you may change the alignment of the buttons:

Now let’s transfer onto columns.
If you would like extra variety with how your submit appears, attempt utilizing the columns block.
The columns block has a number of layouts to select from corresponding to a 50/50 break up and 25/75/25 break up:
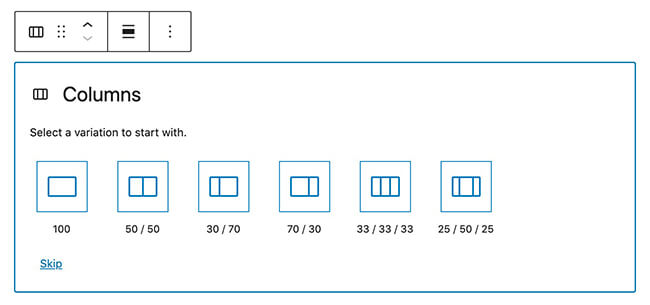
As soon as you choose a break up variation, your columns block will produce a single row break up into the variation you’ve chosen. Right here’s an instance after we choose the 50/50 break up:
Our block has now been break up into two even blocks, every which we are able to add a brand new block to.
This function is extremely helpful in case you run a assessment or information website as you may get artistic with the format while not having a third-party plugin.
Spacers and separators are, because the title suggests, a good way so as to add house and break up components of your submit.
There may be not a lot to customise with these two options as their function is good and easy. With the spacer you may drag the dot to extend its top (it’ll seem clear on the frontend not gray), and in case you click on on the separator, you may change its color and style in the best panel.

So now we’ve been via the most typical Gutenberg blocks and methods to use them. What in case you’ve already written your submit elsewhere? How do you switch your submit into WordPress?
Including a submit in WordPress from a phrase processor
Not everybody desires to begin writing a WordPress submit from scratch. For those who’re like me, we’re used to being in Microsoft Phrase or Google Docs merrily typing away writing content material for our website.
So, on this state of affairs, how will we get our content material into WordPress?
Merely copy and paste it.
Fortunately, the WordPress visible editor is nice at understanding the content material that’s being put in it.
Right here’s an instance of a submit from Google Docs after which it pasted into WordPress:
Google Docs:
WordPress:
Headings, paragraphs, photos and bullet factors it’ll perceive and be capable to convert into blocks simply.
For those who’ve put embed codes in for audio or video information, WordPress will mechanically convert them into embed blocks, and embed the audio or video in your new submit.
Nonetheless, they’re a number of edits you’ll must do.
- The heading level can be transferred however not the formatting, due to this fact, you’ll want to alter alignment, nonetheless daring and italic formatting will keep.
- Second, relying on the picture file kind, the picture might not be transferred, nonetheless a clean picture block can be as an alternative as an alternative and also you’ll must add it. If the picture is transferred, you’ll want to reserve it to your Media Library by clicking the save button:
- Customized columns you create in a phrase processor received’t be acknowledged in WordPress and can be transferred as one row paragraph blocks.
When you’ve pasted your content material and formatted it as you want, click on Save draft.
9 steps to get your new submit prepared for publication
Utilizing both strategies so as to add your new submit to WordPress, you’ll finally attain the purpose the place your submit is full.
What are the subsequent steps earlier than publication?
Right here is an summary of the best option to get your submit good earlier than clicking the publish button.
- Set the writer
- Set the permalink
- Choose a class, and tags (if relevant)
- Choose a featured picture
- Write the excerpt (if relevant)
- Add social media photos
- website positioning title and meta description
- Preview the submit
- Publish or schedule the submit
1. Set the writer
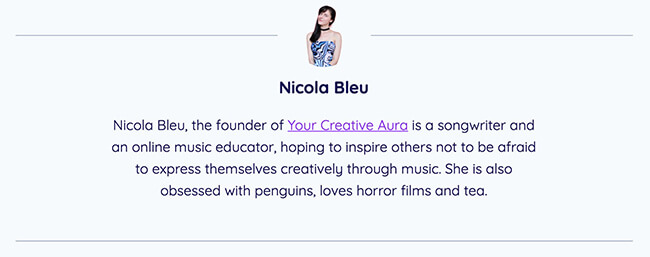
Click on on the tab under the writer and choose a reputation:
When you choose a reputation that individual’s writer bio will seem on the revealed submit. WordPress themes current the writer bio in numerous methods, due to this fact, verify your themes settings:
2. Set the permalink
The primary time you click on Save draft, WordPress will give the brand new submit a submit ID within the permalink tab. For those who neglect so as to add a title to the submit, the submit ID can be created with the default settings in WordPress, often numerical:
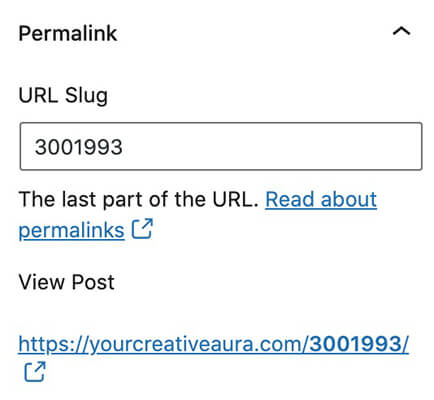
Edit the permalink with related key phrase/s from the submit.
3. Choose the class, and tags (if relevant)
Classes set up your content material and enhance the reader’s expertise after they wish to study extra on a particular subject.
You possibly can create mother or father and little one classes: mother or father classes are broad of their which means, nonetheless, little one classes slim down the subject:
Class pages are mechanically created each time you add a brand new class to your website.
Class pages are helpful to the reader as they’ll view all of the content material on a subject simply moderately than searching via the website.
When you have enabled the Tag Cloud widget in your website, you may add tags to your posts by way of the Tags tab.
4. Choose a featured picture
To show featured photos in your new submit go to the Featured picture → Set featured picture:

Add your featured picture, set the alt textual content and insert. You possibly can edit how your featured picture seems in your posts and weblog web page by checking your WordPress themes settings.
5. Write the excerpt (if relevant)
Not each weblog exhibits excerpts on the weblog web page, nonetheless, within the submit editor you may manually add an excerpt.
For those who want to use the primary few sentences mechanically then head over to your WordPress themes settings to pick out this selection.
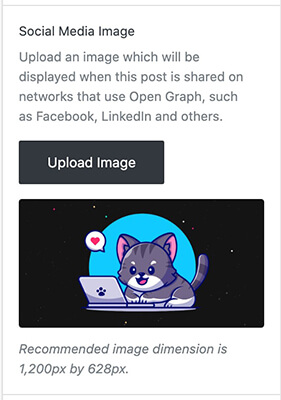
6. Add social media photos
Having social media photos uploaded to your new submit is helpful for these readers who love your content material and share it on the social media account. It’s additionally helpful in case you plan to make use of content material promotion platforms.
7. website positioning title and meta description
Understanding the aim of website positioning (SEO) may be difficult to a brand new blogger. Find out how to efficiently implement website positioning methods into your content material is an essay in itself – nonetheless, we’ve got a completely fledged rookies information to website positioning so that you can study extra.
There are a number of free and paid WordPress website positioning plugins you need to use, every with quite a lot of options. Crucial are with the ability to have an website positioning title and meta description:
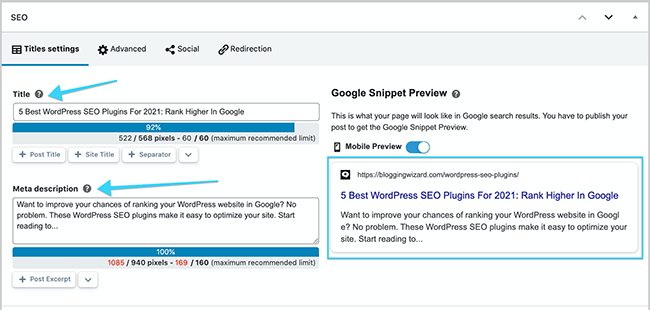
The preview function means you may see how your submit would look in search outcomes.
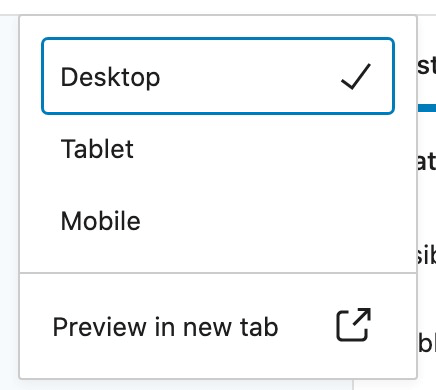
8. Preview the submit
Earlier than you hit the publish button, you’ll must preview the submit and verify how the submit seems on the frontend of the website.
Click on the preview button, and choose the way you’d prefer to assessment the submit: desktop, pill or cellular:
If the submit seems precisely how you want the final step is to publish.
When you have an editor who evaluations the submit earlier than publication you may click on pending assessment. For those who tick pending assessment the submit will now transfer from the drafts tab to a pending assessment tab within the posts dashboard:

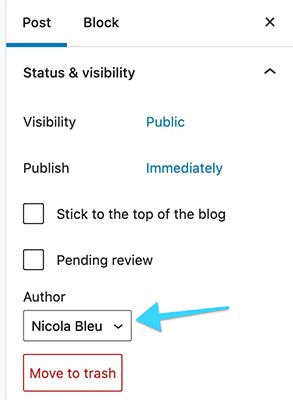
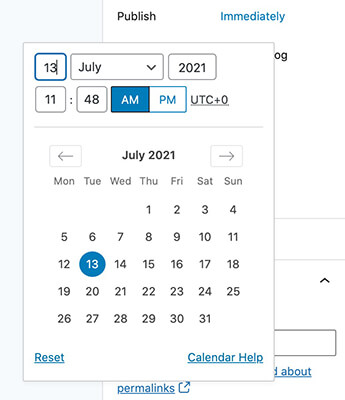
9. Publish or schedule the submit
As soon as the submit is able to be revealed you’ve two choices: publish instantly or schedule a publish date.
To publish the submit instantly merely click on the blue publish button.
You possibly can schedule a publish date by clicking on ‘instantly’ and a calendar will popup. Right here you may choose a date and time to publish your submit:
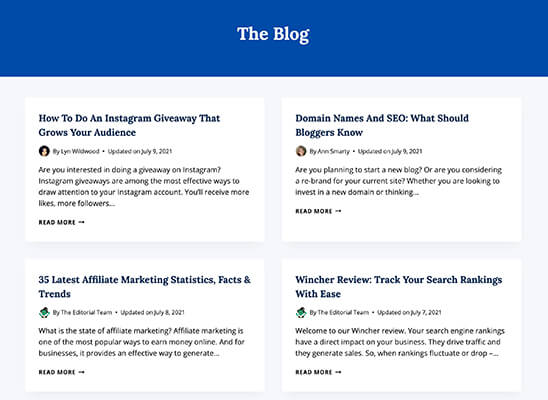
When you hit publish, your revealed submit will now seem in your weblog to your website guests to take a look at. All of the posts you create can be revealed to the entrance web page of your weblog until you choose a date from the previous.
Right here’s the entrance web page of Blogging Wizard’s weblog:
As default, a submit can be revealed as public, nonetheless, you may have personal posts and password protected posts.
When you’ve revealed the submit you may make edits and updates additional down the road. Modifying posts is simple, all that you must do is hover over the submit on the posts dashboard and click on edit:
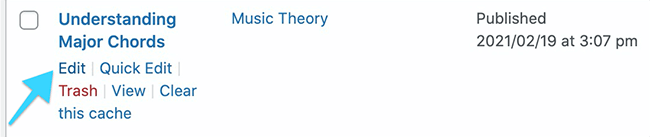
When you’ve made your edits to the submit, click on replace.
Over to you
And there we’ve got it! A totally fledged rookies information to including, enhancing and publishing a WordPress submit.
Let’s summarize the method:
- Posts → Add New so as to add a brand new submit
- Kind in your headline
- Use the Gutenberg blocks to craft your content material or paste your content material in from a phrase processor – paragraph, headings, picture, buttons and spacers are amongst the most typical blocks to make use of
- Don’t neglect to save lots of draft all through writing and formatting your content material
- As soon as your content material is full get your submit prepared for publishing by:
- Naming the writer
- Setting the permalink
- Choosing a class, and utilizing tags if required
- Selecting a featured picture, and importing social media photos
- Writing an excerpt in case your theme exhibits this
- Full the website positioning title and the meta description
- Lastly, preview your submit for final checks after which publish instantly or schedule a publication date
What’s subsequent? You’ll want to advertise your article to get the phrase out. Our information to selling your weblog will make it easier to get began.
Did you discover this text useful? We’d love so that you can share it with anybody who might discover it helpful.
Disclosure: This submit comprises affiliate hyperlinks. This implies we might make a small fee in case you make a purchase order.